Gen III Aux Tank Install

Our rides evolve - keep track of yours here.
Post Reply
User avatar
NTXFJR
Contributor
Veteran
Posts: 1811
Joined: Sat Oct 22, 2016 7:17 pm
FJRModel: 2016 FJR1300A
Location: Midlothian, Tx
x 2886
x 1504

Gen III Aux Tank Install

Post by NTXFJR »

Back earlier in the year, Joe the tool maker posted up looking for any interest in his tag along aux tanks. I had a real interest in one of them because I like the way they look on the feej, but I couldn't justify that kind of coin for one right now. Still, I was looking for options for a tank since yfo is right around the corner, and I'm likely going to try some iba type stuff on the way out and back. I saw some pretty neat adaptations of racing fuel cells that were fitted onto other's feej's and thought maybe that might be a doable way to go for me.

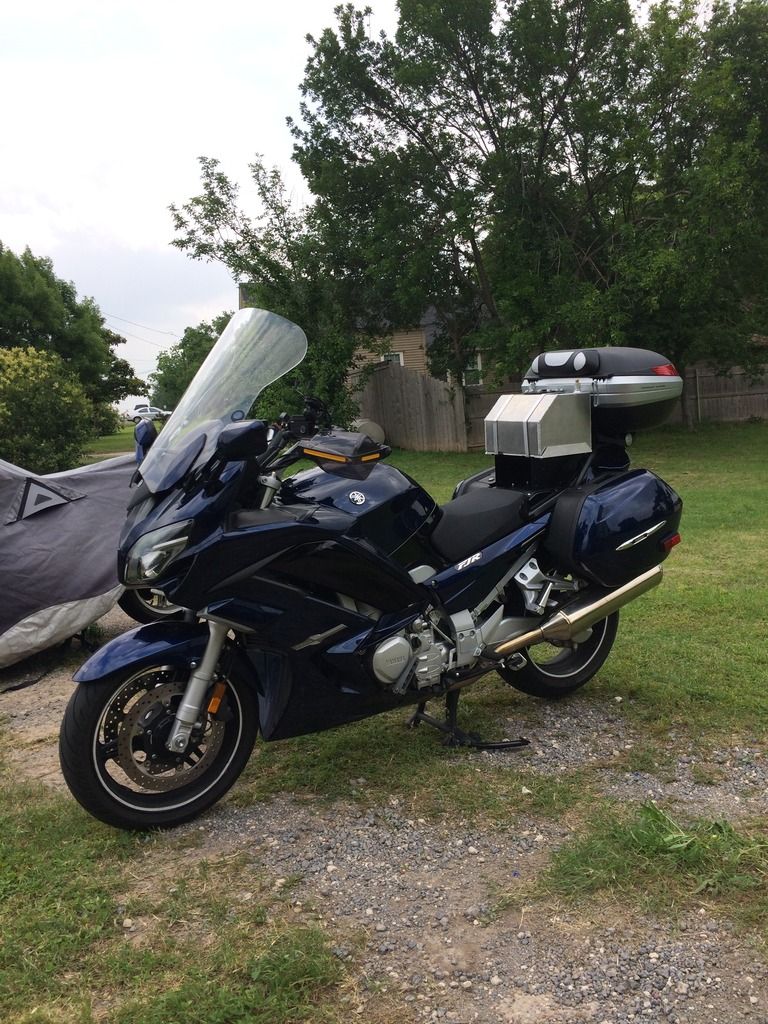
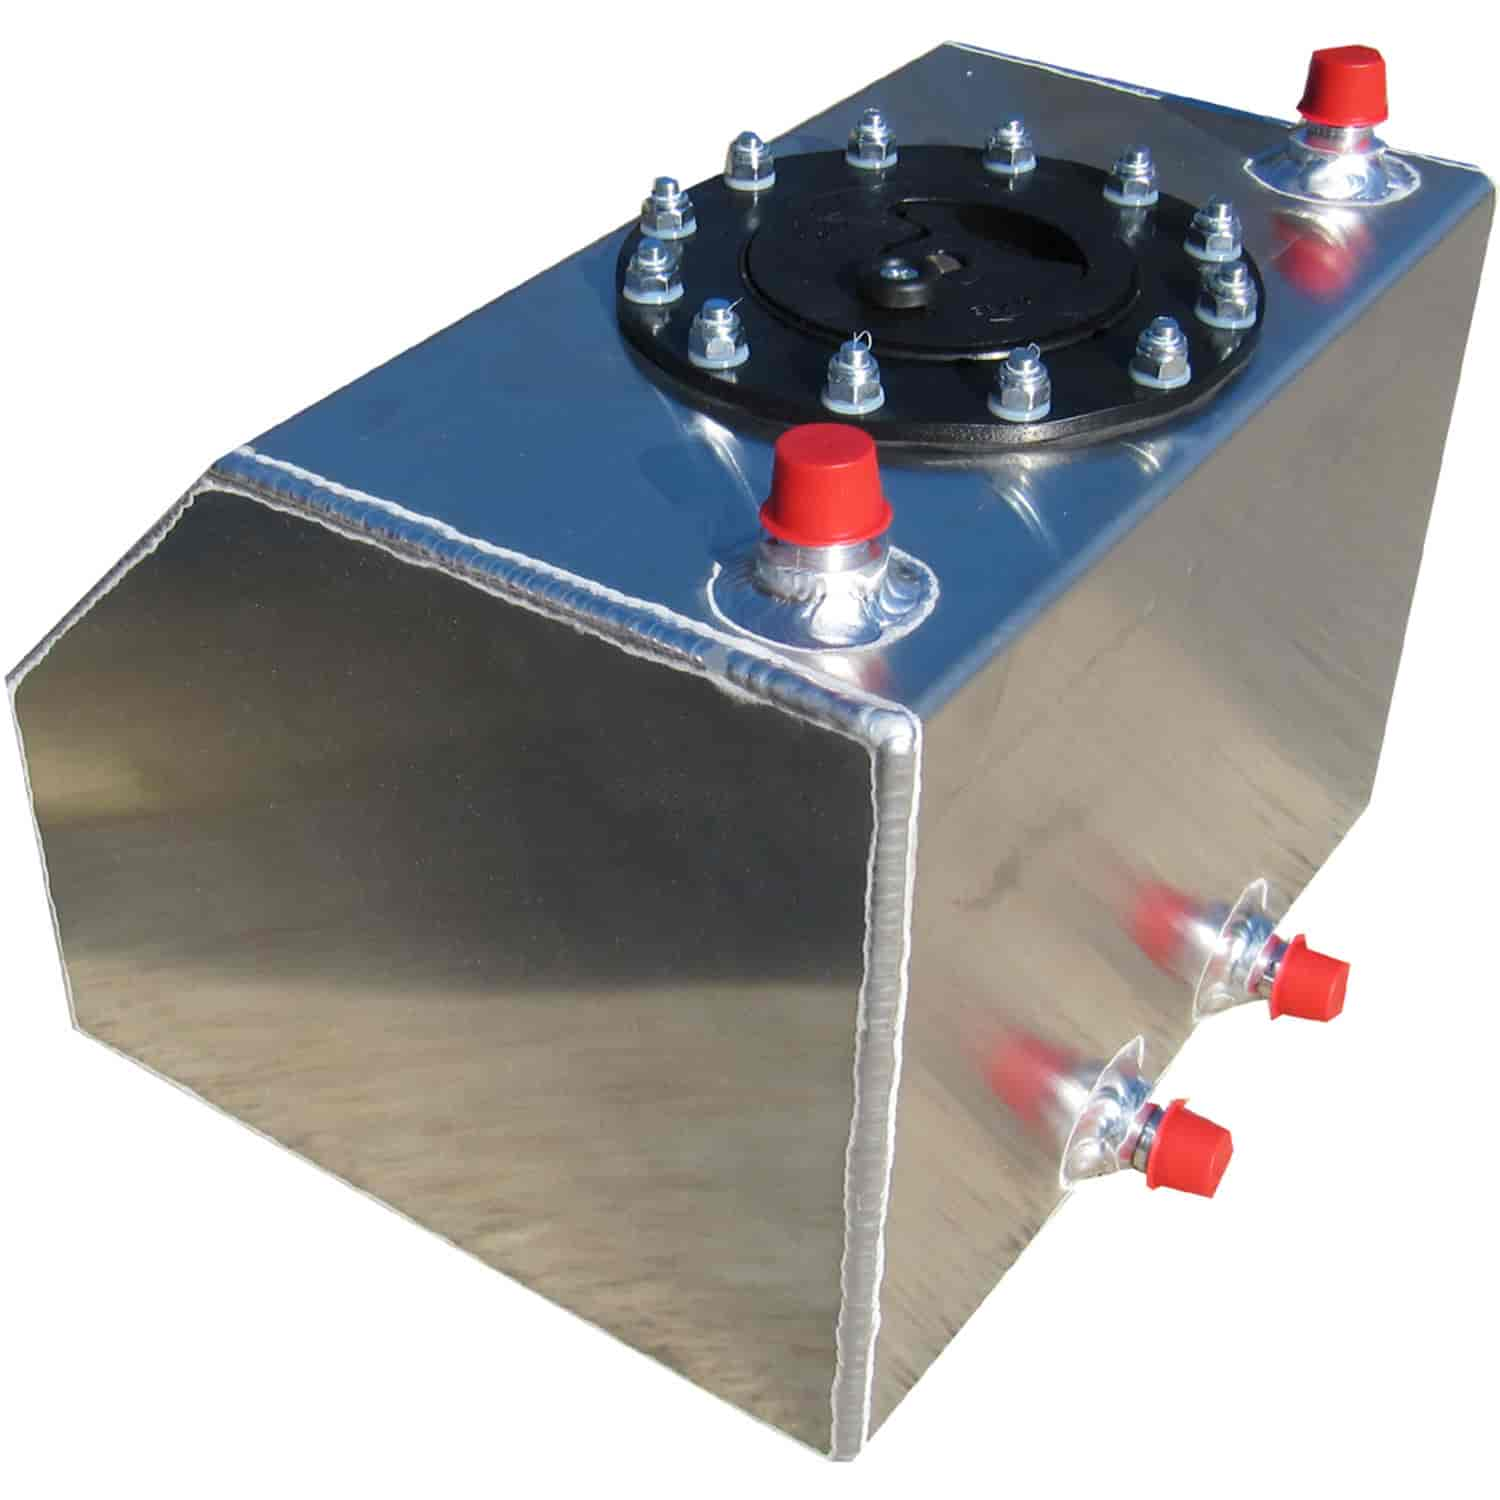
So the hunt for a tank begins. I found a decent deal on a new RCI 4 gallon tank on ebay, they had 5 gallon ones also, but because of the Givi top case back there in the way, I decided that my butt might appreciate the added 2 inches of room on long hauls, and that 4 gallons should be plenty of safety margin in most cases. That buy is where the bargain ended though. I spent a lot more for the fittings, valves, quick disconnect, and various stuff for brackets.

This is the tank I chose. It has 3/8" JIC connections, which I ended up tapping to npt pipe threads because the fittings hug in tighter and are cheaper
Image

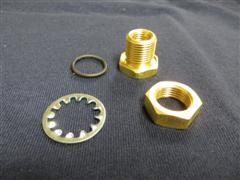
I had quite a time looking for the type of bulkhead fitting I wanted to hook up to the main tank with. A forum member mentioned Maple Farkles website, and they had the perfect fitting at a reasonable price.
Image

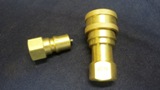
They also had a quick disconnect that was tried and proven and quality made at a reasonable price. It was a little bulkier than I was looking for, but in the end I'm thinking it'll work out just fine.
Image

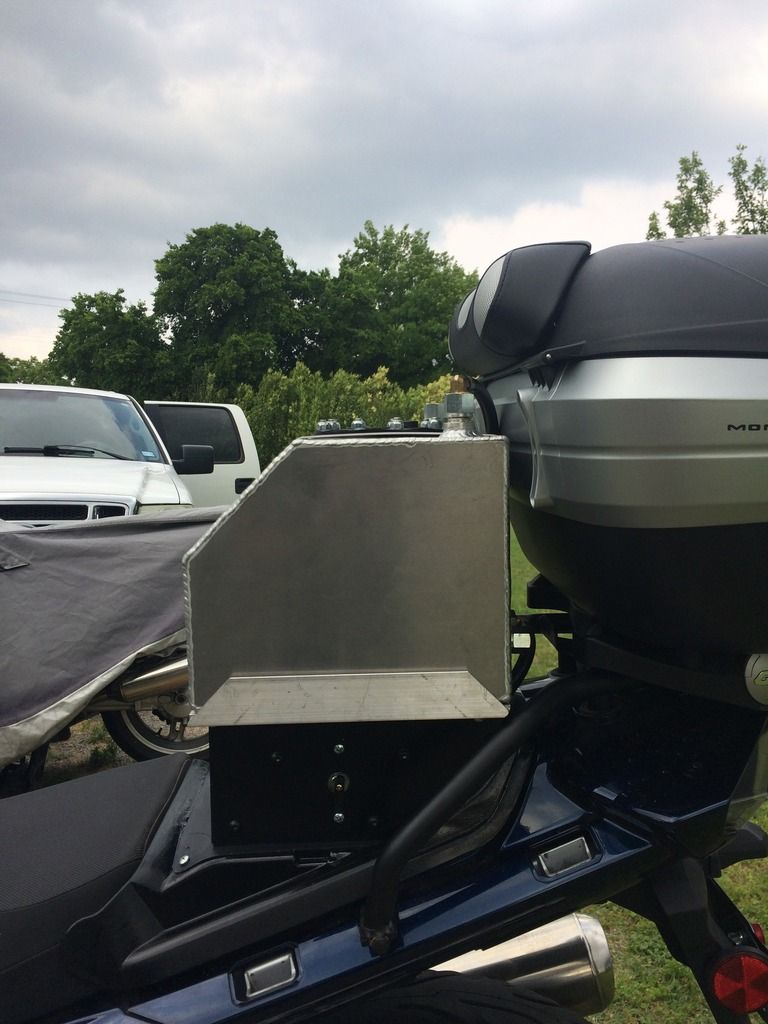
I used jic hydraulic caps to seal the -6an ports, then drilled and tapped 1/4" npt in two of them, one for the fuel line, and one on top for the vent.
Image

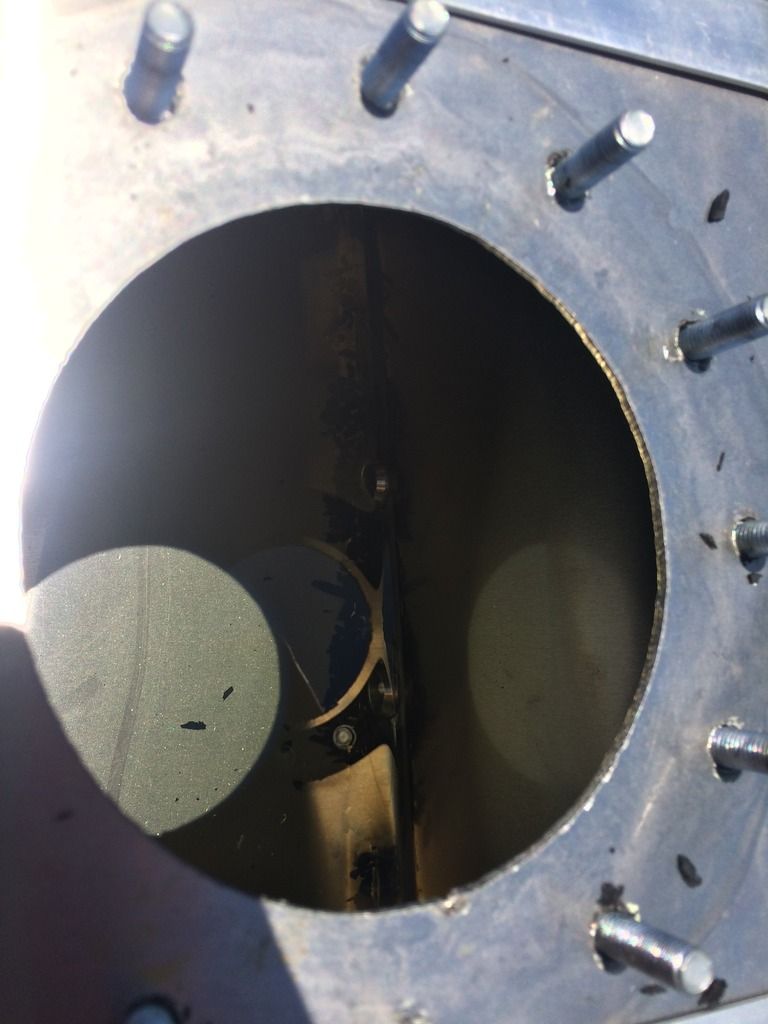
First step was to empty the tank, I drained as much fuel out as I could, then flushed the tank out with water a few times.
Image

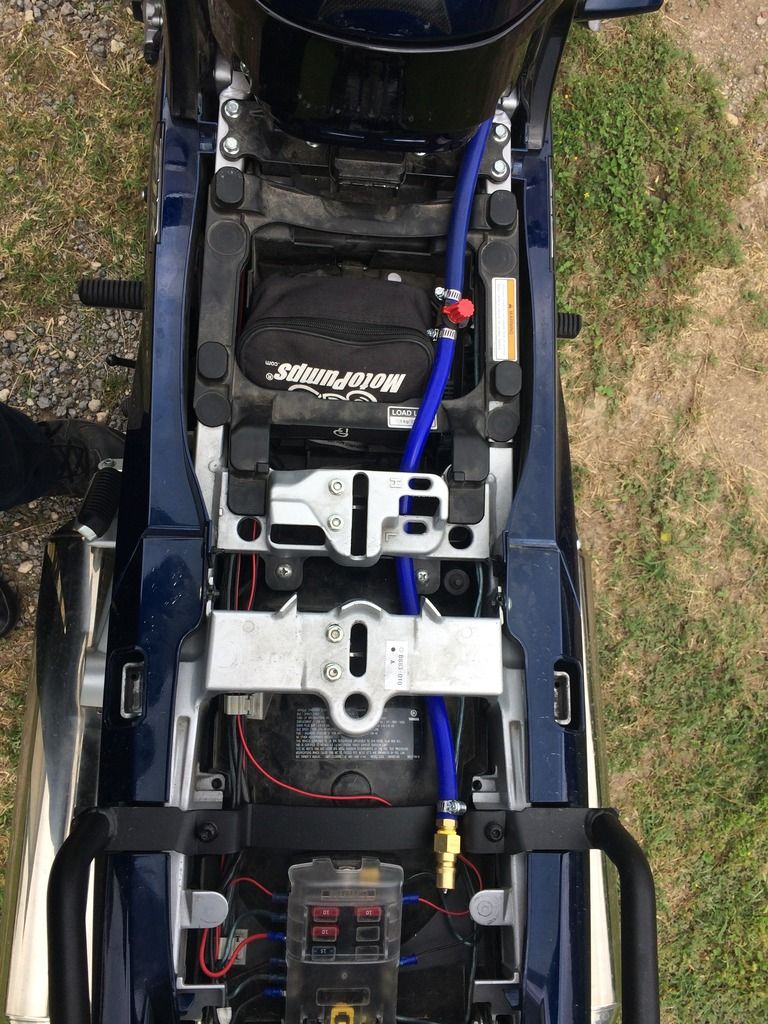
Then comes the scary part, penetrating the tank. I planned to tap the tank and have the line exit under the right rear of the tank and route the fuel line under the seats. In the end, I could've moved the hole a little more rearward to allow more room for the pump's fuel line, but it worked out ok. No going back now.
Image

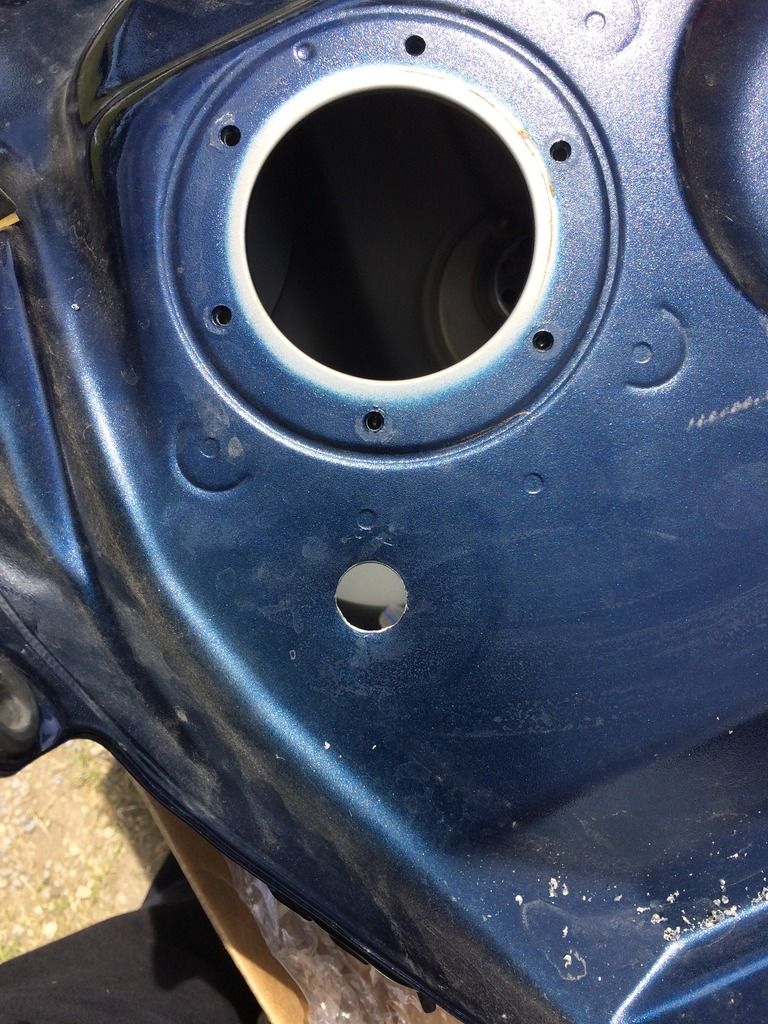
I used the same trick others have used by taping a spray can lid inside the tank to catch the shavings.
Image

Bulkhead fitting. I chose 5/16" fuel line and fittings for this project
Image

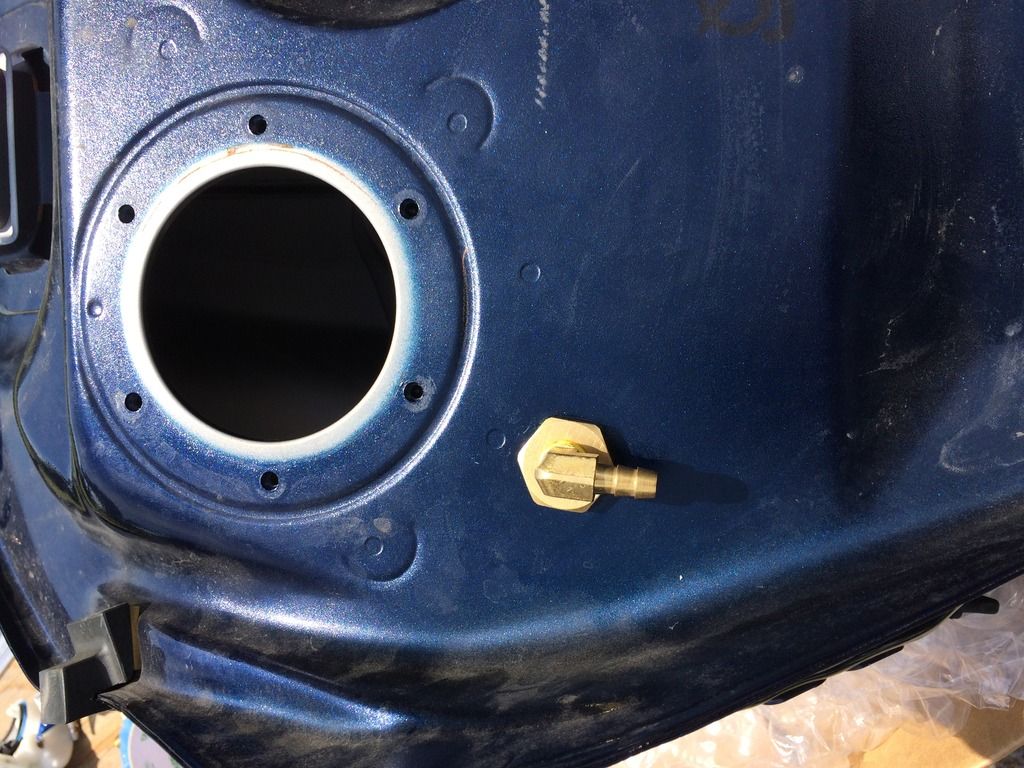
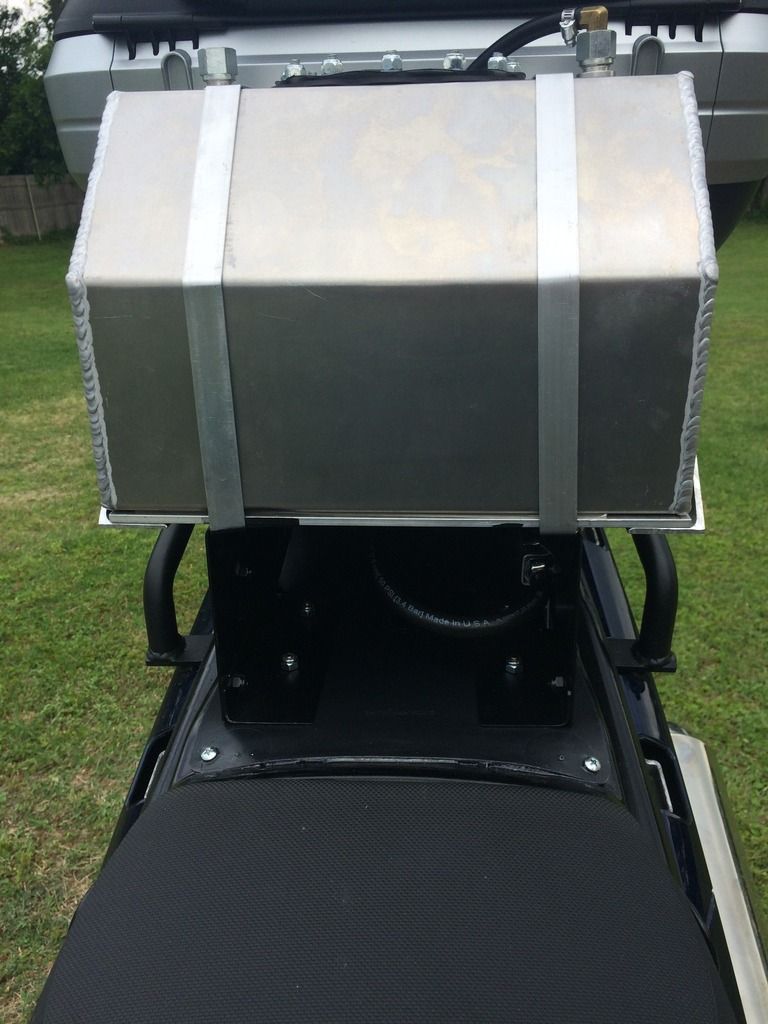
Bulkhead, 90 degree flare fitting, and fuel line installed, and a thorough flushing out with gas to purge the water, tank is now ready to put back on the bike. I chose silicone fuel line because I figured the added flex might come in handy. It ended up being a double edged sword because it also squashes down easier. I wound up running up to the parts house to get some standard rubber fuel line to run under to seats and to the tank because of this.
Image

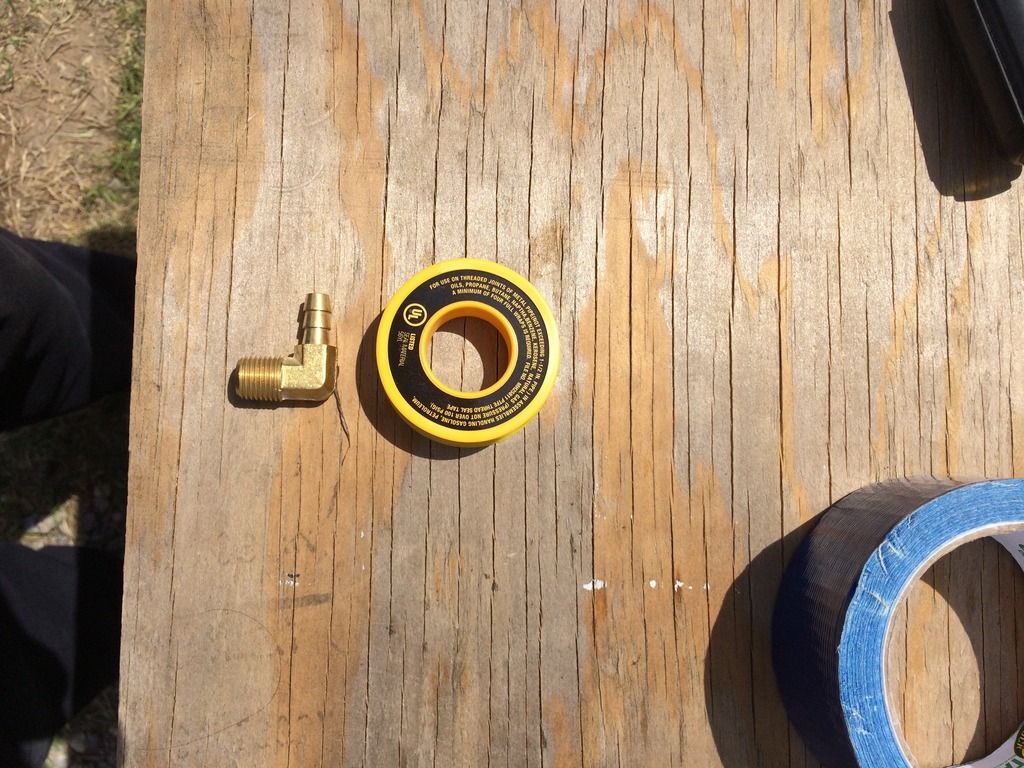
I used this tape on all threaded joints, it is specifically designed for fuel applications,
Image

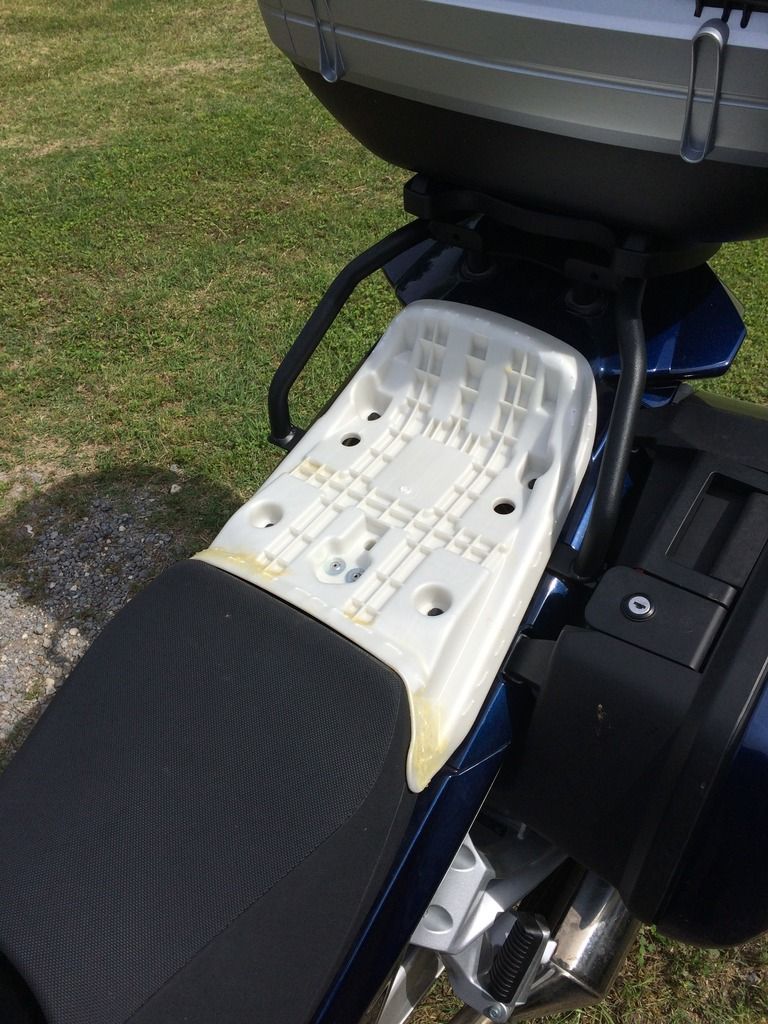
I was looking for a means to be able to install and remove the tank without a major undertaking. I figured using a seat pan was the easiest way to get the job done. It saved me hours of fabrication time developing a suitable platform. I chose to strip the cover and padding off, but this left recesses underneath.
Image

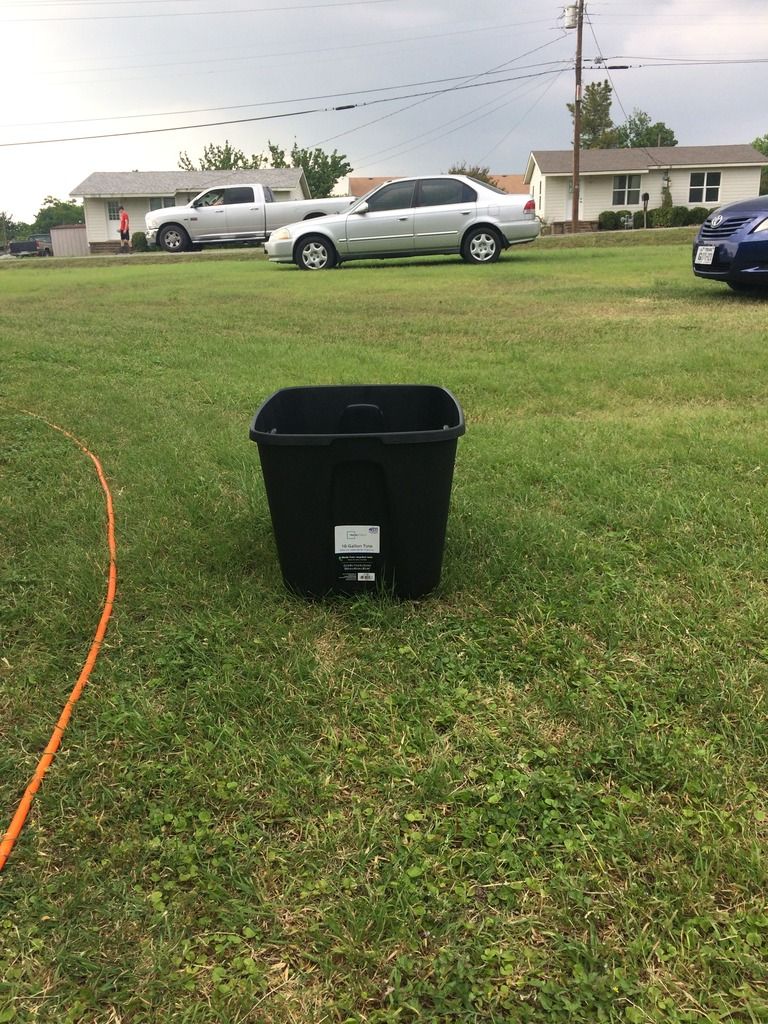
I invested $5 at walmart to cover this up, I cut a section out of the bottom of this tote, then overlayed it onto the seat pan.
Image

I had some layout challenges because the Givi SR357 support rails angle inward toward the top box making it so that fuel cell wouldn't fit as far back for butt room as I was looking for. In the end, I ran up to the local metal mart and picked up a piece of 6" cee purlin, then cut it down to the 5" I was needing to clear the top of the Givi support bars. I was beginning to be rushed for time, so I wound up not getting as many pics as I'd like of the final fabrication process. Hopefully these pics can tell the story good enough. The tank ended up being raised 5" off of the seat pan due to clearance issues. I was hoping to keep it down for a lower center of gravity, but hopefully 30 lbs net filled won't be that big of a deal, maybe it'll help with the gravity flow. The aluminum angle and bar came from the local Ace hardware, not the supplier of choice for me due to their pricing, but they had it along with all the hardware I needed and it was handy. I had some adhesion promoter for painting plastic left over from painting my son's bike. I used this on the seat pan to prep it for paint. When bolting the purlin brackets to the seat pan, I used doubled up fender washers underneath. With the seat pan and it's release latch, I can remove the tank and put the pillion seat back on in around a minute.
Image
Image
Image
Image
Last edited by NTXFJR on Sun Apr 30, 2017 11:24 am, edited 3 times in total.
Twigg loved this
We travel not to escape life, but for life not to escape us.

Image

IBA # 65427
Twigg
Member
Posts: 192
Joined: Sat Nov 19, 2016 2:35 pm
FJRModel: 2005 FJR1300A
x 43
x 31

Re: Gen III Aux Tank Install

Post by Twigg »

Looking good.

I used that same tank for a while. It's decent but has a few drawbacks. You won't get 4 gallons in it. In the end it will probably deliver an additional 3 gallons, reliably ... which was fine for me. Three gallons is 120 more miles PLUS, it allows you to use all of the gas in your OE tank. Effectively that's a bigger increase in real capacity than it might seem.

You are going to want to change that filler. They are useless. The gaskets perish quickly and the cap can be anything from easy to remove, to damned near impossible. Swap it for a 45-degree angled filler spout. They are about $50 and come with a nice screw-on cap. Any 12-hole pattern will fit.

In the end, I wanted to get closer to the IBR limit, and I was pissed at the wasted storage space that the top of the tank could offer, so I designed one, and had it built for me. It was way cheaper than I thought it would be.
Canadian FJR
Veteran
Posts: 567
Joined: Mon Sep 01, 2014 8:31 am
FJRModel: 2018 FJR-1300ES, 2010 Ural Gear Up, 2003
Yamaha FJR-1300, 2001 Kawasaki KLR-650 (Gone to a new home), 1997 Suzuki TL-1000s (Gone but not forgotten), 1976 Honda 400 Four, 1968 Honda C-50 Step-thru
Location: Nova Scotia, Canada
x 46
x 524

Re: Gen III Aux Tank Install

Post by Canadian FJR »

Nice neat install. You will be spoiled by the extra range. Thanks for posting.


Canadian FJR
User avatar
Hppants
Contributor
I post more than I ride
Posts: 6348
Joined: Wed Oct 19, 2016 9:22 pm
FJRModel: 2021ES
x 12235
x 10701

Re: Gen III Aux Tank Install

Post by Hppants »

Very professional looking install. You've got way more balz than I do, drilling a hole in your OE tank. Wow.
"I guess it comes down to a simple choice, really. Get busy living. Or get busy dying."
- Andy Dufresne, Shawshank Redemption

Image
User avatar
Cav47
Veteran
Posts: 3876
Joined: Sun Feb 16, 2014 7:42 pm
FJRModel: 2015 ES well appointed FJR
2012 KLX 250S
2022 Honda CRF450RL
Location: Central Illinois.
x 10590
x 7499

Re: Gen III Aux Tank Install

Post by Cav47 »

^^^^^ I will second that!!
I often have found myself when I was not looking, nor did that discovery take place where I thought it would!

Image
User avatar
NTXFJR
Contributor
Veteran
Posts: 1811
Joined: Sat Oct 22, 2016 7:17 pm
FJRModel: 2016 FJR1300A
Location: Midlothian, Tx
x 2886
x 1504

Re: Gen III Aux Tank Install

Post by NTXFJR »

I had some reservations about putting a hole in the tank too. But others had forged on before me with good results, so that and the nice bulkhead fitting I was able to buy eased that part of it, the only other concern I had really was screwing up and drilling in the wrong spot and not having proper clearance under the tank. One of the features about this bulkhead fitting is that if I ever decide to remove the tank and fuel lines permanently, I can leave the bulkhead fitting in and use a pipe fitting to plug the hole.

I think Twigg made a good point on the capacity of the tank. The manufacturer puts anti slosh foam inside which takes up room. I'm not sure that's necessary and I might want the extra fuel capacity. Has anyone had issues running without it?
We travel not to escape life, but for life not to escape us.

Image

IBA # 65427
Twigg
Member
Posts: 192
Joined: Sat Nov 19, 2016 2:35 pm
FJRModel: 2005 FJR1300A
x 43
x 31

Re: Gen III Aux Tank Install

Post by Twigg »

NTXFJR wrote: Sun Apr 30, 2017 10:52 am
I think Twigg made a good point on the capacity of the tank. The manufacturer puts anti slosh foam inside which takes up room. I'm not sure that's necessary and I might want the extra fuel capacity. Has anyone had issues running without it?
It's only an issue during the few minutes you are transferring fuel. There are a few minutes when the tank is half full, and the gas could, in theory, slosh from side to side. But think about it ... It's not much gas, it won't upset the bike. The entire set-up weighs less than a small child, even when full.

If you were entering the Iron Butt Rally, it would fail Tech. Insp. without the foam ... for normal people it will be fine.

The point I made about the filler is, I think, more important than the foam issue, although in truth the foam reduces the capacity very little.

You might want to put a filter on the vent line. That would be more useful than putting one in the line between the tanks where one really isn't needed. A filter on the vent line prevents crap being sucked in when the temperature goes down.

Whatever filler you use long term, please tether the cap. It's easy on the aircraft fillers as you can fix the tether under the vent fitting in the cap. You WILL lose it one day, if you don't. Don't ask me how I know :D

Put an electrical ring fitting on each end of a length of paracord. Fix one end under the vent and the other end under one of the ring bolts.
User avatar
NTXFJR
Contributor
Veteran
Posts: 1811
Joined: Sat Oct 22, 2016 7:17 pm
FJRModel: 2016 FJR1300A
Location: Midlothian, Tx
x 2886
x 1504

Re: Gen III Aux Tank Install

Post by NTXFJR »

Filled it up today for a shake down run. I removed the anti slosh foam before hand but it still only took 3.5 gallons with minimal downward internal lip on the filler cap opening. I'm guessing that the fuel came within .5" from the top of the tank. I'm not understanding how a manufacturer can label a tank 4 gallons if it won't hold that much?
We travel not to escape life, but for life not to escape us.

Image

IBA # 65427
User avatar
NTXFJR
Contributor
Veteran
Posts: 1811
Joined: Sat Oct 22, 2016 7:17 pm
FJRModel: 2016 FJR1300A
Location: Midlothian, Tx
x 2886
x 1504

Re: Gen III Aux Tank Install

Post by NTXFJR »

Did a static flow test today. It was flowing 3.5 gallons into an empty oem main tank in 20 minutes. I get around 36 mpg's on the interstate with cruise locked in at 85mph, I figure that's somewhere around .78 gallons consumption in 20 minutes, or 2.36 gallons per hour. It should yield at least 300 miles reliably now before going to reserve mode - hopefully...

27 days to yfo 8-)
We travel not to escape life, but for life not to escape us.

Image

IBA # 65427
User avatar
NTXFJR
Contributor
Veteran
Posts: 1811
Joined: Sat Oct 22, 2016 7:17 pm
FJRModel: 2016 FJR1300A
Location: Midlothian, Tx
x 2886
x 1504

Re: Gen III Aux Tank Install

Post by NTXFJR »

So earlier comments on the flat type filler cap were spot on. The very first fueling I did on a shake down run proved that this cap was going to be nothing short of a pita from here on out. It wedges stuck in it's seat, I ended up taking a razor knife to coax it out. So I ordered one of these:

Image


After installing it, I fueled the tank up to the bottom of the filler neck and was pleased to see 3.8 gallons on the pump, with the other style cap it took 3.5 gallons. I ended up letting the bike sit in the driveway overnight and planned another shake down run the next day. The set up wound up performing as hoped. However, when I went to install a lanyard on the filler cap, I discovered this:


Image


I couldn't believe that the mfr would supply a gasket that was not ethanol resistant, what a disappointment that was. So, off comes the nifty filler cap and I ran up the the auto parts house to get some real gasket material along with old school fuel proof Permatex gasket sealer. I was glad to catch this while still around the house vs during the road trip to Cali.
wheatonFJR loved this
We travel not to escape life, but for life not to escape us.

Image

IBA # 65427
User avatar
Poolboy2
Casual Rider
Posts: 75
Joined: Wed Oct 04, 2017 9:57 pm
FJRModel: 2009 FJR 1300
Location: Council Bluffs,IA
x 243
x 161

Re: Gen III Aux Tank Install

Post by Poolboy2 »

So how is your tank performing . gravity feed only?
User avatar
NTXFJR
Contributor
Veteran
Posts: 1811
Joined: Sat Oct 22, 2016 7:17 pm
FJRModel: 2016 FJR1300A
Location: Midlothian, Tx
x 2886
x 1504

Re: Gen III Aux Tank Install

Post by NTXFJR »

I used this setup on a bbg3000 going out to yfo, then a 50cc from San Diego to Jacksonville. I set it up with gravity feed which performed well for over 9000 miles on that ride with no issues.

Sent from my SAMSUNG-SM-G930A using Tapatalk

Poolboy2 loved this
We travel not to escape life, but for life not to escape us.

Image

IBA # 65427
User avatar
gixxerjasen
I post more than I ride
Posts: 5641
Joined: Thu Feb 21, 2013 5:50 pm
FJRModel: 2007 Yamaha FJR1300AE
Location: DFW
x 5104
x 8339

Re: Gen III Aux Tank Install

Post by gixxerjasen »

Stupid photobucket.
Uncle Hud loved this
My Blog
Current Bikes:2007 Yamaha FJR1300AE | 2016 KTM 1190 Adventure R | 2001 Suzuki DRZ-400E
Son's Bike:2019 Honda CRF250L

I'm here to serve as an example of what NOT to do.
User avatar
Poolboy2
Casual Rider
Posts: 75
Joined: Wed Oct 04, 2017 9:57 pm
FJRModel: 2009 FJR 1300
Location: Council Bluffs,IA
x 243
x 161

Re: Gen III Aux Tank Install

Post by Poolboy2 »

That's awesome Craig, Glad to see everything working well. I love the extra miles my tag-along-tank provides. I turn fuel pump on for 14 minutes and all fuel is transferred, shut the petcock,and use gauge.

The one thing i'm curious about is, Does the aux tank flow into the main tank fast/reliably enough that you just use the bikes fuel gauge to determine when the aux tanx is empty/all fuel is utilized. What's your method for knowing whether you still have fuel in aux tank?.
User avatar
NTXFJR
Contributor
Veteran
Posts: 1811
Joined: Sat Oct 22, 2016 7:17 pm
FJRModel: 2016 FJR1300A
Location: Midlothian, Tx
x 2886
x 1504

Re: Gen III Aux Tank Install

Post by NTXFJR »

Poolboy2 wrote: Fri Nov 24, 2017 1:32 pm That's awesome Craig, Glad to see everything working well. I love the extra miles my tag-along-tank provides. I turn fuel pump on for 14 minutes and all fuel is transferred, shut the petcock,and use gauge.

The one thing i'm curious about is, Does the aux tank flow into the main tank fast/reliably enough that you just use the bikes fuel gauge to determine when the aux tanx is empty/all fuel is utilized. What's your method for knowing whether you still have fuel in aux tank?.
I usually opened it up at around 3 bars indicated which meant that there was enough room for the aux tank to safely drain into the main tank without overflowing, and I usually just left it open after that. Not by intent really, but mainly just because of all the senior moments involved between opening it and having to close it back up when it came time to fill up and I finally remembered it again. My set up takes around 20 minutes to consistently drain out. I wouldn't call it reliably accurate really, but I was always able to tell that fuel was flowing because my gauge would start going up after 5 minutes or so, and would top out at around 6 bars when done. I did the math in an earlier post and don't remember the details, but it would drain faster then the bike would burn it and the fuel never failed to completely drain out. The most accurate I got was knowing how much further I could go once the reserve indicator started flashing. This setup would have made 400 miles a reality for me if needed, though I didn't push it past 350 miles on the Cali trip because of the Iron Butt rules.
We travel not to escape life, but for life not to escape us.

Image

IBA # 65427
dcarver
Contributor
Veteran
Posts: 941
Joined: Wed Jan 23, 2013 12:18 am
FJRModel: Gen2, Superior 2006, Gen 3 2013 twice as good!
x 107
x 1453

Re: Gen III Aux Tank Install

Post by dcarver »

I want to know how you got that ham fist of yours inside the tank to tape the catch cup? :D
dcarver
Contributor
Veteran
Posts: 941
Joined: Wed Jan 23, 2013 12:18 am
FJRModel: Gen2, Superior 2006, Gen 3 2013 twice as good!
x 107
x 1453

Re: Gen III Aux Tank Install

Post by dcarver »

Good stuff NTXFJR!

Here's how I did mine. Interesting we both came up with nearly identical locations!
https://candybuttorg.ipage.com/cba/comm ... omment-686
User avatar
NTXFJR
Contributor
Veteran
Posts: 1811
Joined: Sat Oct 22, 2016 7:17 pm
FJRModel: 2016 FJR1300A
Location: Midlothian, Tx
x 2886
x 1504

Re: Gen III Aux Tank Install

Post by NTXFJR »

dcarver wrote: Thu Dec 14, 2017 8:45 am I want to know how you got that ham fist of yours inside the tank to tape the catch cup? :D
I never said it was easy! You're right, ham fists don't do well in there but still managed it somehow. I used duct tape which peeled back off pretty easily. If I had it to do over again, I would move the fitting back about a 1/2" or so to give the fuel pump lines better clearance, but it works. Nice work, I like that tank a lot!
We travel not to escape life, but for life not to escape us.

Image

IBA # 65427
Post Reply